05 es2z account groups file maintenance
ES2Z - Account Groups File Maintenance
| Program ID: | ES2ZP01 |
|---|---|
| Mapsets: | ES2ZMS1, ES2ZMS2 |
| Input File: | Internal Security File (ES2SECR) |
| I/O Files: | Account Groups File (ES2GRP), Group Header/Lookup File (ES2LKUP) |
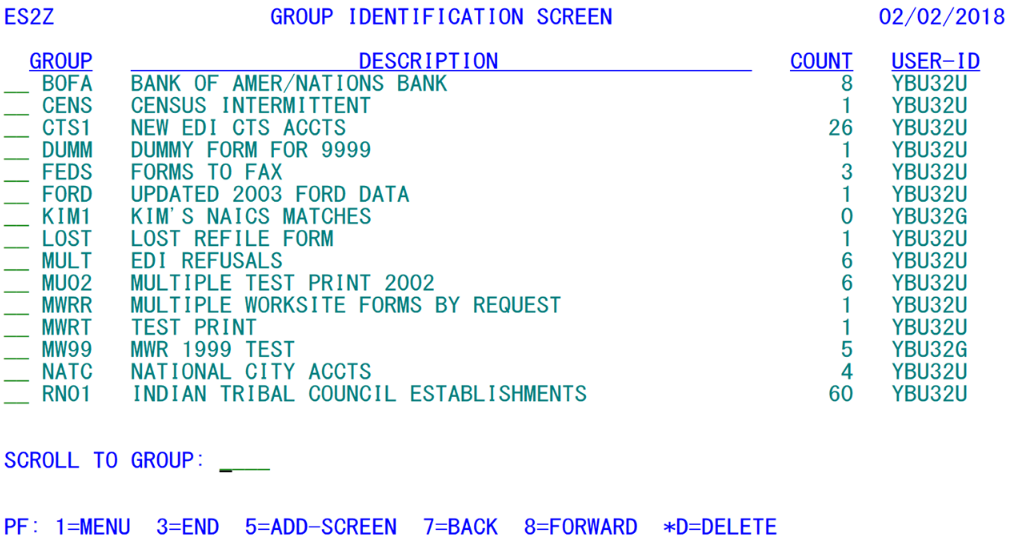
This CICS transaction represents the traditional means of updating the Account Groups File. The Group File is used to store lists of U-I account numbers in collections for special use. Two maps are included in this program’s processing. The first (shown above) provides a list of the group ID codes currently in use. As with other list screens in the system, the F7 and F8 keys are used for paging back and forth through the group ID’s. The first screen’s group list is accompanied by a description or title for each group, the CICS logon ID of the person who created the initial accounts list, and the number of records currently included in the group. If the group was created as an output from the Micro Selection process (in Job 020D) or the Micro Query screen (in Job 040D), then those job ID’s will appear instead of the CICS user ID. This header information is not contained in the Group File itself, since the records (only 22 bytes long) are far too short to contain a description. Instead, the header data are placed in Lookup File records. The key for these Lookup records consists of the letters “GC” (for Group Comment data), followed by the group ID code and six spaces.
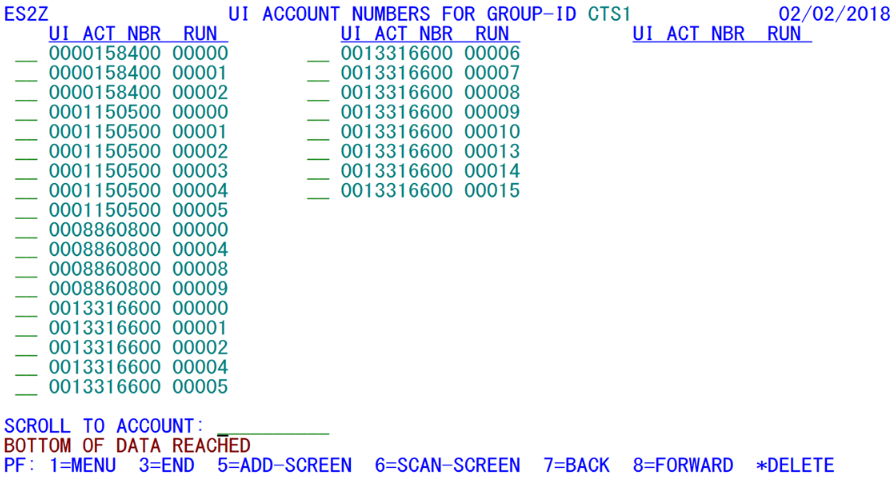
To add a new group, press the F5 key to produce a clear screen to fill in the top data line. The header information is written to a new “GC” record on the Lookup File. Once this record is in, the second screen is displayed (a sample of the inquiry version of this screen is depicted below). The addition of entries to this detail screen only uses the middle column of the three-column set. The inquiry version (as shown) displays all three column sets (the indicated group only contains part of the first two), but does not allow changes or additions to the accounts list. Up to 18 accounts can be added at a time from this screen. The other two columns are skipped in this process to keep the program from reaching an unmanageable size, due to repetitive code. Each row consists of three fields: one for cursor placement, one for the 10-digit U-I account number, and the third for the 5-digit RUN (or reporting unit number). In the add mode, however, the cursor positioning field is not shown.
Enter each of the account number-RUN combinations involved in the group into the rows on the screen. As with other U-I account and RUN entry fields, leading zeroes may be suppressed. In addition, the reporting unit can be left blank if the entry represents a single or master account (with a zero RUN). If more than 18 establishments are involved in the group, the user can press the Enter key after each group of 18 records have been typed in. This writes the records into the Account Group File and clears the screen for the next list of account numbers. When all entries for the group are in, the user can press the F1 key to return to the first screen (the group ID’s list), showing the number of establishments in the new group. If fewer than 18 establishments are listed at the time the Enter key is pressed, the entries will still be added to the file, but the mode will switch to inquiry, since the program assumes that the entry process for this group has been completed. To return to the add mode, the F5 key must be pressed again.
A useful feature in ES2Z account entries is the all-family selection option. If the reporting unit field is left blank, all members of a multi-unit family will be selected in whatever application utilizes the group containing this account-only entry. Primarily this is useful for a shorthand entry in the Micro Selection Job (020D). If all of the worksites of a dozen multi-families need to be selected for a particular report, the blank RUN field with a valid account number entry makes this not only possible, but simple. The alternative would be to manually enter hundreds or even thousands of worksite entries on the ES2Z screen.
The sample screen shown on the previous page is entirely made up of full 15-digit SESA ID specifications. However, if there were only two worksites for account #158400, an equivalent entry (which would also save two items on the list), would be to have the entry “0000158400 ” on the list, instead of identifying “00000”, “00001” and “00002” as the reporting units that were being dealt with. When the U-I is listed separately for a multi-worksite family, the batch job using the group will generally interpret this as a select-the-whole-family mode. If, however, there was an account 13316600-00003, then the method suggested above would not work for having a blank RUN field with the “0013316600” account number.
There are two ways to add new entries to an existing group, each controlled by its own function key. Before selecting either of these, however, the group itself must be selected from the menu screen shown previously. Selection is accomplished by placing the cursor to the left of the desired group and pressing the Enter key. This will display the list of SESA ID’s already present in the group. The “standard” method to add accounts is to press the F5 key to clear the screen and display the eighteen entry lines in the center columns. This is the standard entry method when adding a new group. Processing is then identical to that of a new accounts group, except that any duplicate accounts (which will not be written to the file) will be flagged with an error message.
The alternate add-in method is to use a barcode scanner with the F6 key. This process mimics the entries of the EARR screen (described later in the refiling screens). Barcode scanning is useful in cases such as when MWR forms have been returned due to an incorrect address. Once the address has been corrected, the accounts can be selected as a group with the barcode reader. The screen below shows one of these entries in process. The most recent scan will show up in the second line, while the top entry line is left clear for the next entry.
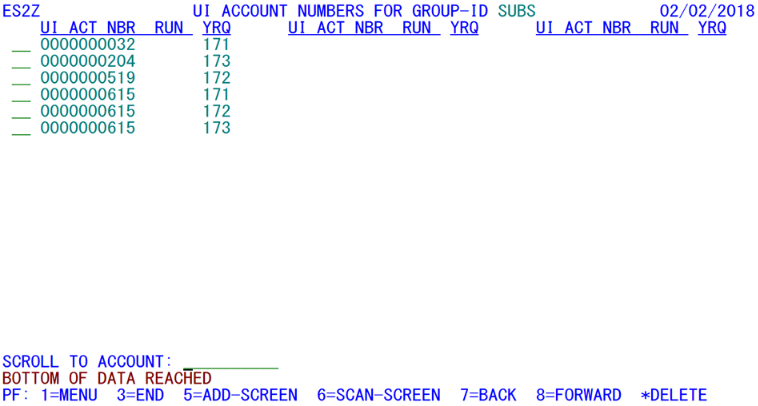
One special group is processed differently than all of the rest. This is the BLS subset group, which appears with the ID of “SUBS”. Unlike the other group entries that only contain a SESA ID association, the subset records remove the RUN field and add a year/quarter field. This is a BLS requirement to list those accounts and year/quarter associations for any data they are questioning. The subset group is processed through the 021F job to produce an EQUI record for every establishment and year/quarter listing found in “SUBS”. Even the screen layout changes for the subset listing, since the year/quarter field must be added to the header fields. A sample of the SUBS records display appears above.
Note: Even though the F6 Scan method is listed as an option for the SUBS group, it is unlikely to be a viable alternative, since the barcode should never contain the appropriate year/quarter after the SESA ID.
There are two ways to enter new records into this group. First, the entries can be made here on the ES2Z screen. If BLS has provided a list of U-I numbers and the quarters to be selected, the “Z” screen can be used to quickly load all of these at once. On the other hand, if you prefer to take a look at the establishments in question first (which is a good idea), the ES2C screen should be used instead. To use this method, pull up an account in question by entering its SESA ID. Then move the cursor to the quarter in question (anywhere on the line) and press the PF17 (or Shift-F5) key to add that quarter to the SUBS group. This is especially useful when multiple quarters for the same account are needed, such as account #615 below, which has three quarters in 2017 – 1st, 2nd, and 3rd – each can be selected with a point-and-click cursor movement, followed by the F17 key, rather than re-typing the U-I and RUN values a second time. If you happen to click on the same quarter twice, a message will be displayed indicating the record is already on file.
If some of the accounts are to be deleted from the group, they are isolated by notations made on the detail screen. The blank field to the left of any to-be-deleted account must be filled with the “*D” notation. Any and all of the accounts can be deleted in this way. When the Enter key is pressed, as many records as are flagged with “*D” will be vanish from the group. However, the SUBS group will be automatically emptied by Job 021F, making the manual deletion of these records minimally important, at best.
Deletion can also extend to an entire accounts group. When the first screen (the groups menu) is displayed, the “*D” notation can be applied to the blank field that precedes one of the group ID numbers. The program responds with a confirmation prompt of “*** PRESS ENTER TO CONFIRM OR PF5 TO ABORT ***”. To carry out the deletion of the entire group, press the Enter key, then all of the account associations in the group will be deleted from the Group File. Then the header record will be removed from the Lookup File, removing all traces of the former account group. To rescind the deletion, press the F5 key. Of course, the subset group “SUBS” cannot be deleted in this manner, as any successful attempt at removing this group would certainly stymie the 021F job.
Obviously, this is a powerful measure, since it can easily wipe out a sizeable volume of data entry and counteract extensive research and building. The group deletion option must therefore be used with utmost caution' to avoid the need to reenter all of the account associations of a group due to a mistaken group deletion. It may also be wise to back up the Account Group File periodically to ensure that data can be recovered if they are inadvertently deleted. This can be accomplished with Job 071B. Job 072B should also be run to make sure that the Lookup File’s group header records remain intact. Both of these jobs should be executed by the programmers of EXPO for Service Center States, ensuring that the correct back-up jobs are run. These jobs are not shown on the regular C-List for utility jobs.
Related Links


