07 tso job monitoring iof
TSO Job Monitoring with IOF
One of the useful features for monitoring jobs in TSO is the IOF (Input/Output Facility). To access the IOF and determine the status of jobs submitted from the C-List, enter =IO on the ISPF Primary Option Menu screen. This command will navigate to a screen that displays the status of jobs waiting to run, running jobs, and output jobs or those completed (illustrated below):
Note: During the initial access of IOF, the screen defaults to the user’s personal YBU identification. Since all jobs submitted through the C-List run under the generic State account (YBUscX), the IOF screen must search for this ID. This is done by typing Prefix YBUscX* and pressing Enter (displayed below). The screen will display jobs for the State. The setting YBUscX is saved when exiting TSO.
Here in the Input Jobs section, the 023D job that was just submitted is displayed. Since it is in Class 7 (shown near the center of the line), it will not run until the weekend run (after the Friday Class 5 and Class 6 jobs have finished). It will remain in this classification until it is activated.
If that is too long to wait, the job can be switched to a current run by changing the Class from 7 to 4, as shown below:
This procedure runs the job immediately. The “moved” (or MOV) statement appears when the job is moved to the Running Jobs portion of the report. Note that your user ID appears as a running job as well. This is because your terminal acts as another batch job, and you can give commands to do whatever needs to be done for batch job submission, FileAid actions, etc. Both of these are shown below:
When the job completes, you will be notified with a message similar to the one below:
The maximum condition code (MAXCC) is important to take note of (shown as zero-suppressed and appearing in the "STAT" column) – any value less than 0009 indicates a successful run. The values of the condition code are as follows:
- 0000 = Normal run, processing had no unusual steps.
- 0001 = Normal run, but some of the steps were not run (like using P-percent or 3/80 types of data masking).
- 0002 = Normal run, but it ran out of possible parameters (up to nine sets).
- 0009 = Erroneous run or abnormal end. The flagged step has a special report printed called ES2ABEND (or with an EARS job, EARABEND).
Other condition codes are possible. These are produced from abnormal-ending (or ABEND) conditions, like a S0C1 (attempting to divide by zero), S0C7 (non-numeric in numeric-only definition), etc. A JCL error may appear because the data are too old (Job 024E), or a file doesn’t exist (062D); but, should you get any such error, you should ask the EXPO Support people what it means.
When the job has completed, it will also be shown in the Output Jobs portion of the display (shown below).
Users can select this job for display by placing an S (for select) in front of it, as shown in the sample below. Press Enter to confirm the selection.
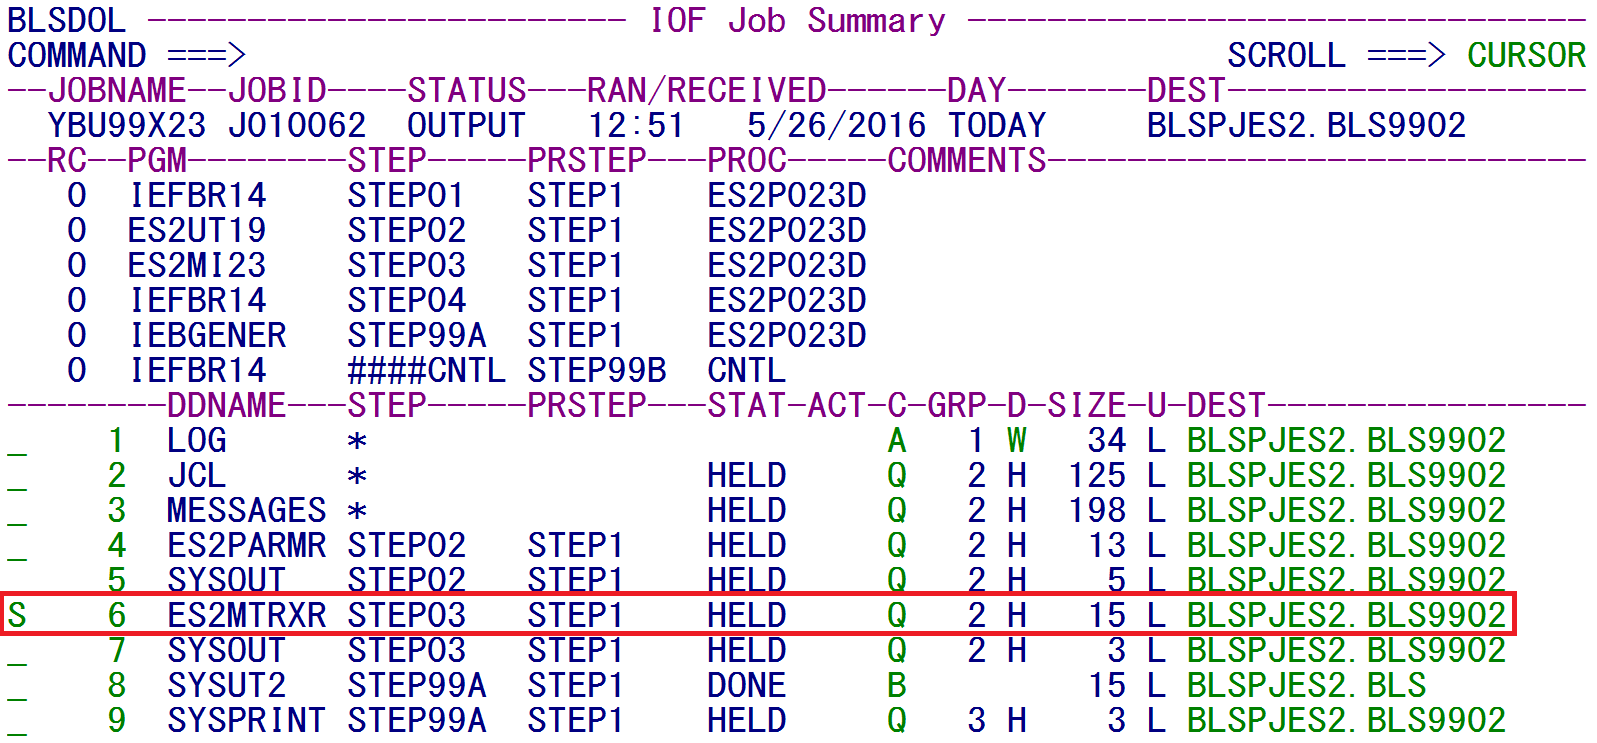
By selecting the job, the following display (shown below) is produced, which shows all the steps that were run in the program and their return codes (the same as the condition code). The data definition names (DDNAME’s) shown in the lower portion identify any produced reports, their step ID, their status (held, done, etc.), the class (shown as the C heading), their disposition (appearing as D heading – where W means a printed data set and H is a held one), and the Size (number of lines produced). In the image below, the Matrix Report (ES2MTRXR) is selected (again, with an S):
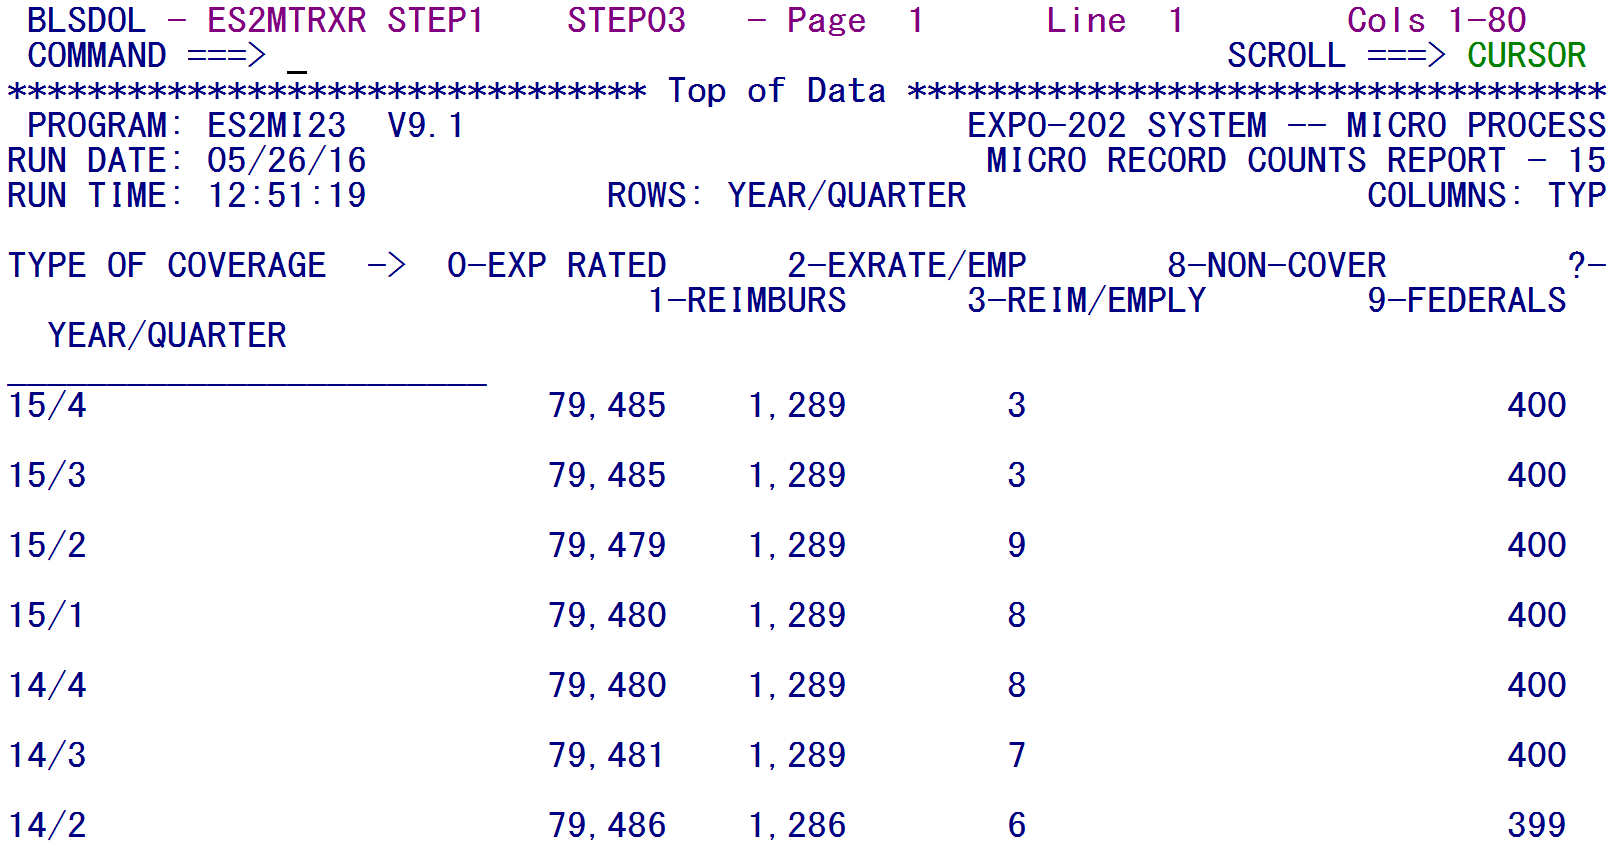
By pressing Enter to confirm the selection, the system will navigate to the following display:
The report above shows the type of coverage codes for a test state by their associated year/quarter values. The entire line is not visible, so the F11 key is available to navigate to the right, and the F10 key can be used to scroll left. Also, the F8 key can be used to go down in the report and the F7 key can be used to navigate back up.
If a large report is displayed (such as a 1000+ page edit run), it can be tiring move down a page at a time with the F8 key. On the COMMAND line, the user can specify a number of lines (up to 9999) to go down or up. Then, press the corresponding function key (F8 for down, F7 for up) to navigate up or down the number of lines indicated on the COMMAND line.
To navigate to the bottom of a report, simply type M on the COMMAND line, to use the “Maximum” number of lines. The F8 key will then navigate to the bottom of the report and the F7 key will return to the top of the report.
Related Links


