05 es2p transaction files review
ES2P - Transaction Files Review
| Program ID: | ES2PP01 |
|---|---|
| Mapsets: | ES2PMS1, ES2PMS2, ES2PMS3, ES2PMS4, ES2PMS5 |
| Input File: | Internal Security File (ES2SECR) |
| I/O Files: | Administrative Transaction File (ES2ATRN), Micro-Omni-Aux Transaction File (ES2MTRN), Quarterly Transaction File (ES2QTRN), Micro File (ES2MIC) |
This program allows the user to review all entries of the three transaction files (Administrative, Micro-Omni-Auxiliary, and Quarterly) for a specified account, showing the history of enacted changes, viewed with screen images having the same general format as the ES2C screens. Five types of screens can be displayed by this transaction.
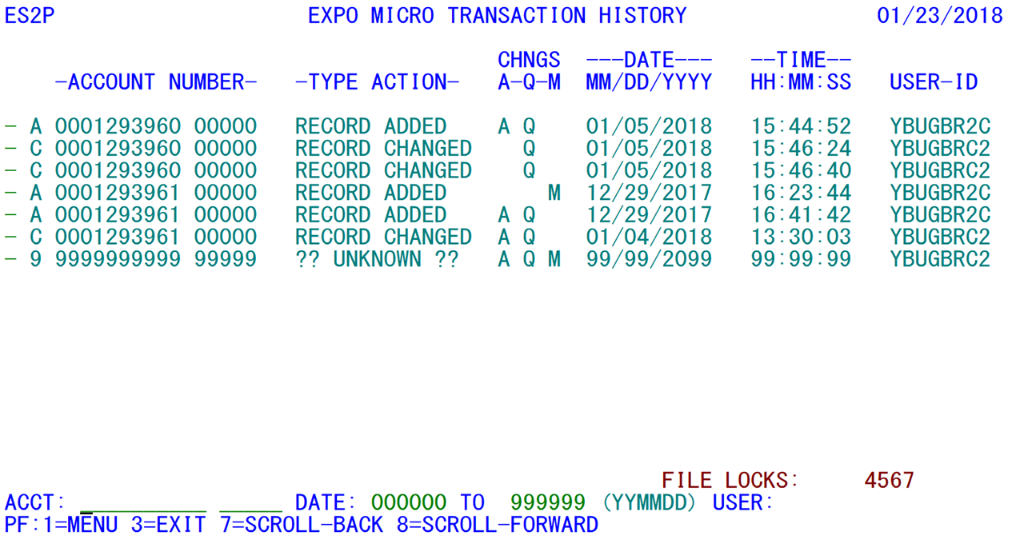
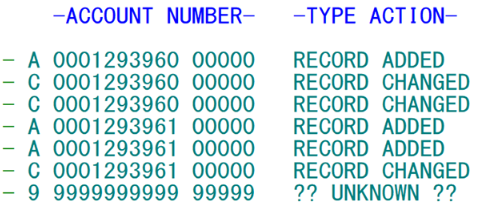
The first screen (shown above) is a list of transactions that show the type of transaction (add, change, or deletion, represented by both the code letter (“A”, “C”, or “D” (“9” means an end of file has been reached))) and the description (“-TYPE ACTION-”, after the SESA ID). Between the code and description is the (combined SESA ID, composed of) U-I account number and reporting unit number (each displayed below).
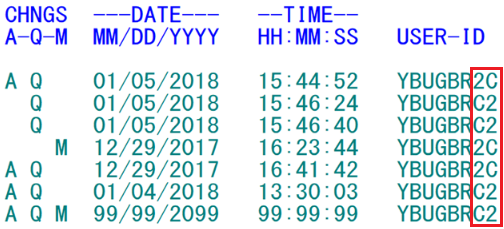
Following the Type Action description, the Transaction File(s) involved (“A” for Administrative micro data, “Q” for Quarterly micro data, and “M” for Micro Auxiliary data), the date and time of the transaction, and the CICS User ID or batch program ID that had modified the Micro File record are displayed:
The only changeable fields on this listing screen are those on the second line from the bottom. Here another U-I account number can be entered (only the right-most digits are needed) to restart the browsing of the Administrative, Micro-Omni-Auxiliary, and Quarterly Transaction Files at the requested account number. If the given account is not present on any of the files, the first account displayed will be the next SESA ID immediately following the requested account. This is accompanied by a warning message noting that the requested account was not found.
The date and user fields near the bottom are used to restrict the scope of the search to those occurring on or after a given date (if just the first date is entered), only before a cutoff date (when only the ending date is provided), within a date range (if both dates are entered), or those generated by a particular batch program or by a specified CICS user.
These can be useful for tracking down a change if the exact account number is unknown, but either the date can be approximated or the person making the change is known. In the sample screen shown (two images previously), notice that the last two (highlighted) positions of the User ID of on-line entries are abbreviated notations for the transaction ID used (‘2C’ = ES2C Front Screen, ‘C2’ = the 2nd ES2C (Codes) screen, ‘2D’ = ES2D, etc.). When a CICS user ID is selected for isolated listings, these last two characters are ignored so that all of a user’s entries can be viewed collectively.
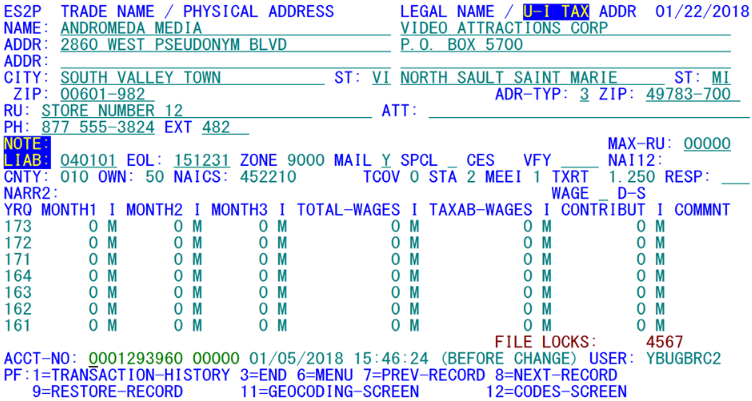
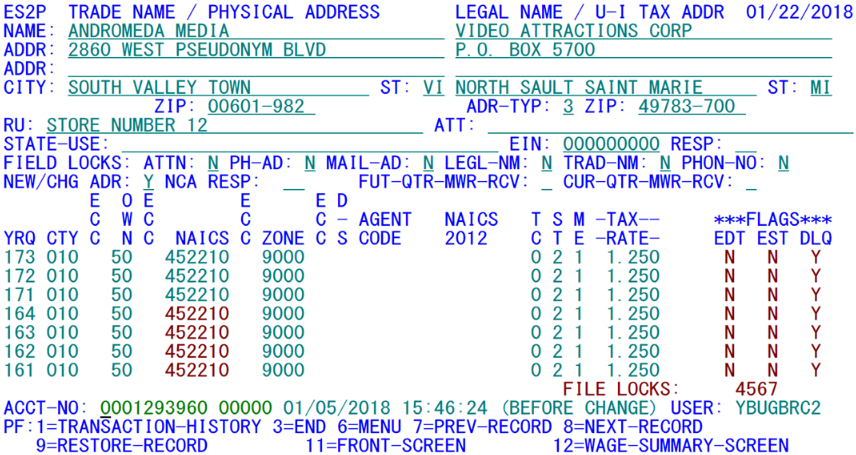
To check the Micro File data associated with a particular transaction, tab through the listings (the cursor moves to the left of each line in the list). Press the Enter key while the cursor is beside one of these lines (on the leading hyphen) to pull up the Transaction record in question. This displays the second screen (shown below), which looks almost identical to the front ES2C screen:
The detail screens allow you to see exactly what was contained in the Administrative and/or Quarterly and/or MOA Transaction File records when the add/change/delete operation took place. One of the things that become readily apparent on this specific instance is that there is nothing different on the front screen; therefore, by switching to other screens (using the F11 and F12 keys) it is possible to see all four of the subordinate screens; when a field is changed it appears in red (displayed below). This helps to accentuate the modifications to reduce the time spent on deduction of the purpose of a particular transaction.
Another change-transaction feature that is readily apparent is that many fields are underscored. There are actually two types of field underscoring present here. First, changed values that are blank in either the before-image or after-image portion (such as the phone extension in the example above) are changed to red underscores so they will still be highlighted as changed fields (spaces don’t show up regardless of their color). Those items (as shown) that are turquoise, but are still underscored, denote Micro (or MOA) File data that are current, since the processed transaction had no dealings with this portion of micro (or micro auxiliary) data. If there is no Micro File record currently on file for a modified-transaction account, even the year and quarter fields will not be displayed on the screen, since nothing is available as a default field value. An “add” or “delete” transaction will have complete data for all fields in the Micro File record. The screen for an add/delete transaction shows all of the fields in turquoise, except for the SESA ID fields at the bottom, which are green. The U-I account number and reporting unit number can be hand-entered to switch to a different account at any time. The other bottom-line fields (date, time, transaction type and user-ID) are not changeable.
You may wonder why some data need to show up as turquoise underscores in the first place. The reason is the way the three Transaction Files are set up. The Administrative Transaction File contains the before-and-after values of all non-quarterly micro fields, but has no MOA or quarter-specific fields at all. The Quarterly Transaction File contains the before-change and after-change values for one particular quarter; but it contains no administrative data, nor any Micro Auxiliary File information. The MOA Transaction File has before-and-after values of a particular type of auxiliary data (either mailing/other address, or email/fax phone number, website address, or contact name and title). Not only does a MOA transaction record have no Micro File data, it doesn’t even have most of the MOA-related data, since there are several record types (“A”, “C”, “E”, “W”) in this file.
Because of the limited storage used in the transaction files, changes can be stored efficiently to allow almost a year’s worth of changes to be stored. The down side is that there can be several changes made to an individual establishment. Therefore, the turquoise-underscored fields might not represent the values at the time of this change. Data are frequently misinterpreted from the ES2P detail screens because of timing issues. For example, if the data are in a screen, only administrative data are modified. Let’s say that the 17/1 employment had been ’14 15 16’ at the time of the phone number change. If it were changed days later (or even ten seconds later) to the values we see (15 16 18), the ES2P review could be misconstrued as showing this employment present at the time of this change, since it would be under-scored. An even trickier proposition is that some changes (primarily from IMT updates) produce very few transaction records for an audit trail. So the “uninvolved” data could have been vastly different from the current values in the display, and no trace of the change will be found elsewhere in ES2P reviews.
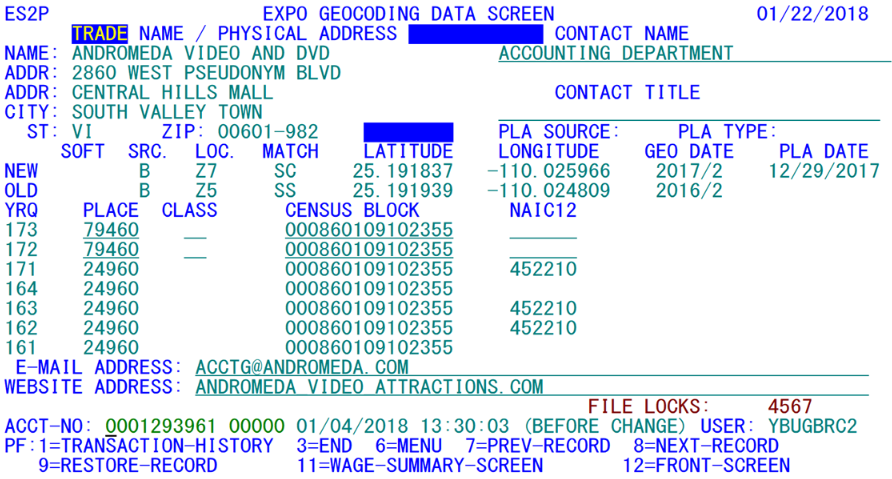
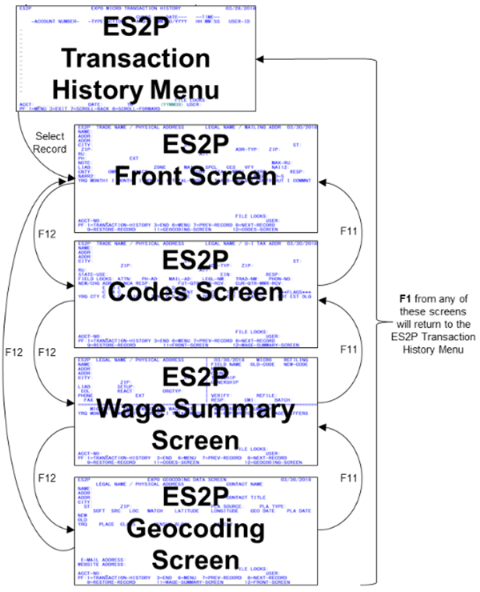
One difference in PF key utilization here versus the ES2C screen is in the definition of the F11 and F12 keys. Instead of acting as a toggle to and from the Wage Summary and Codes Screens (respectively), these keys are used to go backward or forward through the four detail screens. These form a two-direction rotation function. The F12 key shifts from the first (front) to the second (codes) detail screen, from the second to the third (wage summary), from the third to the fourth (geocoding), and from the fourth back to the first. The F11 key reverses the cycle from first to fourth to third to second to first. The Wage Summary detail screen (equivalent to the ES2C Wage Summary) does not include information from the Wage Summary File or the Refiling File, since these fields are not involved in the changes applied to the Micro File record.
Another adjusted definition appears for the F7 and F8 keys. Here they are not always simply used for skipping to the previous or next transaction, but will also take a “half step” in the case of change transactions (see image below). When the before-change image is currently displayed, the F8 key switches to the after-change image of the same record(s). On the flip side, when the after-change image is displayed, F7 returns to the before-change image. In all other cases, however, the previous or next record is located.
Due to the similarities of the screens to the ES2C screen, the third screen (with the dates, the latest refiling, and the employment and wage comparison with the Wage Summary File) is not shown here. If it is needed, please check the ES2C screens.
The other function keys in use include F1, F3, F6 and F9. The F1 key returns to the transaction list when in any of the ES2C-like detail screens; if you are at the transaction list screen, however, F1 will take you back to the main menu in ES2B. F3, as always, will exit the EXPO screens altogether. The F6 key can be used in any of the detail screens to transfer control directly back to the ES2B main menu, without having to skip to the transaction list first. F9 is used to restore transaction data to the Micro File, and is described in detail shortly.
One of the principal reasons for ES2P to exist is to enable the QCEW analyst to restore a record, or the changed portion thereof, back to the Micro File. In the case of a MOA Transaction record, the contents of the Micro Auxiliary File record may be restored as well. If a record was inadvertently deleted from the Micro File, the original record can be captured from the transaction data and written back to the Micro File. When a change to some of the micro or MOA fields is made erroneously, it can be reversed. Although this can be done from any of the four detail screens of the ES2P transaction, the first (menu) screen disallows the restore function, since it will not always produce the intended results. All of the detail screens (designed to resemble the ES2C screens) will show before-change and after-change data separately. The transaction list, however, only identifies that the transaction is a change, not separating the before-change and after-change data. Any restore conducted from this front screen would need to make an assumption as to whether before or after data were desired.
Restoring a record from one of the four detail screens uses the F9 key, but allows the added advantage of examining the data to be used prior to the restore process. Selecting the correct change should be based on observation rather than guesswork. When quarterly data changes are applied in a restore operation, it is most often true that these changes will only involve one or two quarters of data. All unchanged quarters, as well as administrative and micro auxiliary data, are not touched by the restoration. The use flags in the Hold Transaction Record (mentioned previously) determine what parts of the data to send to the Micro File record.
Using the F9 key for a record restore is not accompanied by a confirmation prompt. It merely reports that the record has been restored. If this restore function is used to re-add a record to the Micro File, but it is later found to be a mistake (i.e., it turns out that the record should have been deleted after all), the record must be re-deleted using the ES2C screen. Transfer to ES2C from ES2P can be accomplished through the F1 key (return to the ES2B menu), followed by tabbing the cursor to the ES2C transaction line (or pressing the Home key). If the account number was showing in the bottom portion of the ES2P screen, it will be carried through the ES2B menu program to the ES2C screen, avoiding the need to re-enter it.
As the micro record is updated with a restore function, ES2P keeps the account’s audit trail information on track by generating its own records to the Transaction Files. When the ES2P menu screen is redisplayed after a record has been restored, the confirmation record will be displayed along with the rest of the account’s history. Selecting this line for detail review will show exactly which fields were changed by the operation. Such a verification may be useful when there have been multiple changes to an account’s quarterly data. A restore may have altered more fields than had been intended. The red-enhanced field notations can quickly identify when a change has been overly complicated. The newly-created “before” image can be used to “undo” the deed, so that other manual intervention can be used instead.
Related Links
