05 es2v establishing modifying multiple worksites
ES2V - Establishing or Modifying Multiple Worksites
| Program IDs: | ES2VP01, ES2VP02 |
|---|---|
| Mapsets: | ES2VMS1, ES2VMS2 |
| Extra Tran-ID: | ESV2 |
| Input Files: | Internal Security File (ES2SECR), Lookup File (ES2LKUP) |
| I/O Files: | Micro File (ES2MIC), Micro Omni (or Omnifarious) Auxiliary File (ES2MOA), Administrative Transaction File (ES2ATRN), Predecessor / Successor Actual File (ES2PSA), Quarterly Transaction File (ES2QTRN) |
This transaction is both a shortcut method for establishing new worksites and a facility for mass changes to multiple worksite records on the Micro File. Administrators can also use this screen to delete multiple worksites from a family (the option doesn’t appear for everyone else). There is also a toggle (via the F12 key) to a second “V” screen, used for a one-to-one establishment transfer; this is essentially a hybrid of ES2V and ES2X; it will be described later. The three standard functions (add/change/delete) are selected by the Mode field noted near the bottom of the screen. These respond so differently, though, that they need to be described separately.
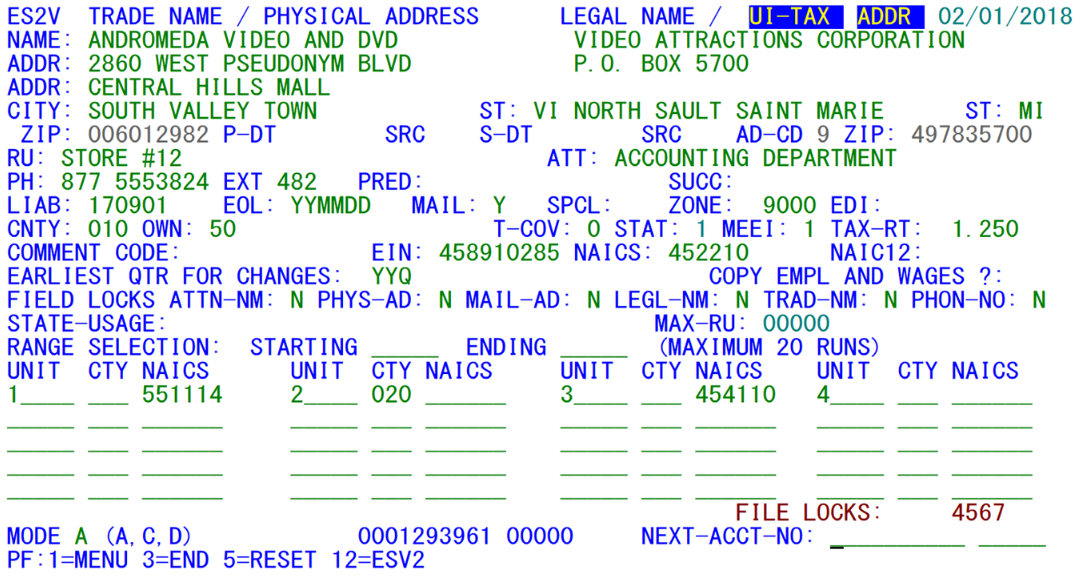
For adding worksites (as in the sample shown above), an existing sample or “pattern” account number must be entered to supply administrative data (and optionally employment and wages) to the newly formed reporting units. This pattern establishment will either be the master account of the family or another, previously-established worksite. As new sites are added, the pattern record’s data will be replicated for the new sub-units as new reporting unit numbers are created. Up to 20 new worksites can be written at one time. Reporting units can either be in a consecutive range or listed individually on the screen. If a range is specified (with the minimum and maximum RUN fields), the reporting unit numbers will be listed individually in the lines below, as though they had been individually hand-typed. Each of the items were typed in by hand in the sample screen, since there were no worksites originally present for the account. When Reporting Unit Numbers (RUNs) are individually entered, they can be typed in either horizontally or vertically.
Fields have been provided in the worksites list in the lower part of the screen to enter individual county (shown as “CTY”) and NAICS code assignments. These fields are especially useful when adding a host of new worksites to an existing family. Although each establishment will have its own physical location address, the county and NAICS assignments provide a streamlined method of setting up some of the most essential codes for the new locations.
The top half of the screen is essentially a hybrid of the Front Screen and Codes Screen from transaction ES2C, including name and address data, various indicator fields, phone, predecessor and successor accounts, current quarter code values, the EIN and lock flags, etc. The lower portion of the screen differs markedly from ES2C, however, since it offers the entry mechanism for identifying worksite reporting units to be added, either as a range of RUNs or as individual reporting unit numbers.
The pattern record may often possess much of the needed data for the new worksites, but could still be lacking in certain areas. For instance, the physical address, field lock switches, phone number or predecessor/successor data may be completely different for the new reporting units than is present in the pattern establishment. It could also be necessary to use a different county or NAICS code for the new sites. To assist in this, most of the administrative data fields displayed for the sample account are modifiable. Field changes entered here will only be transferred to the receiving worksites. They will not be sent back to the pattern record’s administrative data.
Certain field values are known to be unusable for a new worksite, if the pattern record is the master account. For instance, the MEEI code will be ‘2’ in the master, (or ‘1’, ‘4’ or ‘6’ for a single), but should be ‘3’ for the worksites. So the field will be altered automatically. Other fields that are unusable, but don’t have a default value (such as the initial liability date (for a long-standing master record) or the county code (which is normally ‘900’ for the master but must be another valid code for worksites)) will be highlighted in red, and the screen will expect an entry to be made for these values. Any value changes, whether made automatically, or by data entry, will show up with red coloring on the screen. The screen sample (above) has no field changes.
The ‘COPY EMPL AND WAGES ?:’ option (displayed below) allows a complete copying of data from the pattern record. Though this is rarely used, it could be useful for establishing an initial estimate of employment and wages for the new worksites if no data have yet arrived. If five new locations are being introduced, and each is expected to possess about the same employment and wage values, the first could be set up, then it could be used as the pattern in this screen to establish the remaining worksites. However, such cases should be checked beforehand to ensure that only estimates are carried across, since the new sites would not have received reported employment or wages yet.
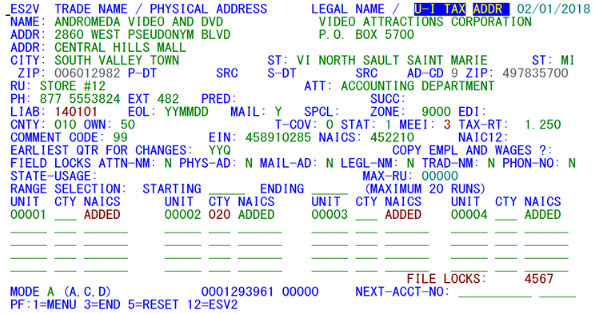
When all of the field changes and reporting unit numbers have been entered, pressing the Enter key will enact the worksite record additions. The confirmation message for each new worksite (shown in the image below) is “ADDED”, appearing in the NAICS field. Any fields entered in the county and NAICS fields for the individual worksites will remain red with the confirmation. A sample of a confirmed add of four worksites appears below. Note that the fields that are changed of questioned appear in red text, and that those with a changed NAICS codes have the “ADDED” word in red.
Often, when a group of new worksites needs to be added, a single worksite should first be created using the ES2C screen – or even ES2V – establishing all pertinent administrative data for that site. The remaining worksites can then be added as a group, using the first worksite as a basis for administrative data.
Transaction File records are also written when worksites are added, tracking all of the data changes in case any of these need to be reversed later. For each new worksite, there is one Administrative Transaction record and four Quarterly Transaction records (with doubled-up quarter data). Because of the high number of file I/O operations performed with each added micro record, no more than 20 worksites can be added at a time. Even with this 20-worksite-per-pass limit, it would take only a matter of a few minutes to develop a huge family of worksites.
Because of the rapid speed with which a large number of new worksites can be established, you should inspect the fields on the screen carefully before confirming the addition of the sites. Deleting a host of mistakenly added worksites presents a much more difficult proposition than adding them in the first place (i.e., the administrator needs to get involved and go through the worksite deletion process, described next).
The worksite addition process is intended to establish brand new locations. If a series of worksites are instead acquired from another multi-worksite employer, they should be handled with the ES2X transaction (described later). The ES2X screen uses a similar format to the one seen here, but will use a predecessor (or sending) and successor (receiving) account and worksites. If only a few worksites need to transfer between two U-I accounts, or a single account is involved (either for sending or receiving), the ESV2 (Supplemental) screen can be more useful for your needs. Refer to ESV2’s documentation, which appears shortly.
Deletions (selected by the “D” in the Mode option list) are a special case, sometimes needed because worksites can be added accidentally in large numbers. Therefore it is necessary to have a means of undoing the damage in short order. But record deletion, especially on a large scale, can affect data integrity. Because of the need to be cautious with micro record deletions, only those people that have administrator-level access (with an “A” in the Security File record) are able to even see the “D” option on this screen.
Deletions do not need to have any information from the pattern record, since there will be no fields to change when the selected records are removed. Once the pattern record SESA ID has been entered, up to 20 worksites can be deleted at a time simply by listing them in the lower part of the screen and confirming the delete operation. The reporting unit numbers can either be entered individually or as a range of RUNs. If the range fields are used, then all worksites within that range will be listed with a prompt to confirm their deletion. If confirmed, these will all be removed from the Micro File.
The sample screen illustrates one of the main reasons you must be very careful in using the delete option. In fact, it is strongly recommended that you select the U-I account number to be affected by the deletes (if another account number is currently displayed) before you select the “D” mode option. Otherwise, the delete mode will attempt to wipe out the worksites you had just added or changed before switching modes. To be safe, do not leave residual account data on the screen.
There is only one confirmation prompt issued to make sure that you want to delete these worksites. The message notes that the deletes are irreversible; take heed, or it could take a long time to undo the damage that can be produced in a few seconds. It is imperative that you check the list of RUN’s ahead of time to ensure that the ones you are after are the only sub-units that will be removed from the file. Use extreme caution in approaching worksite deletion, as it is a loaded “machine gun” without a safety and with a hair trigger.
Note: The only additional safeguard built into the deletion process (beyond the “A” level security access check) is a check of the set-up date of the selected worksites. If these worksites were created within the past three months, they are eligible for deletion. Even though long-standing worksites will remain safe, recent additions are at risk.
For changes, the pattern record’s displayed fields can be altered to mark the types of modifications to effect for the listed worksites. As in the case of added worksites, field changes do not apply to the pattern record itself; they are intended for transfer to the reporting units identified in either the range or individual RUN fields. This type of mass change is helpful in cases where each of the worksites of a family would normally need to be altered individually in the ES2C screen. For instance, a multi-employer may have 20 worksite locations that are all classified in the same industry. If nine of those worksites were to show a shift to another NAICS code, they could be reclassified as a group simply by pulling up one of the unchanged worksites as a pattern record and noting both the new industry and the list of RUN’s to which the change applies.
Related Links


