05 es2n batch job parameter entry
ES2N - Batch Job Parameter Entry
| Program IDs: | ES2NP01, ES2NP02, ES2NP03, ES2NP03, ES2NP04, ES2NP05 |
|---|---|
| Mapset: | ES2NMS1, ES2NMS2, ES2NMS3, ES2NMS4, ES2NMS5 |
| Alternate Transactions: | ESN2, ESN3, ESN4, ESN5 |
| Input Files: | Micro File (ES2MIC), Macro File (ES2MAC - in ES2NP02 only), Internal Security File (ES2SECR - linked module only) |
| I/O Files: | Job Parameters / Lookup File (ES2LKUP), Micro-Selection Parameters File (ES2MISP) / Micro Super-Selection Parameter File (ES2MSSP) / Macro Roll-up Parameters File (ES2RUP) |
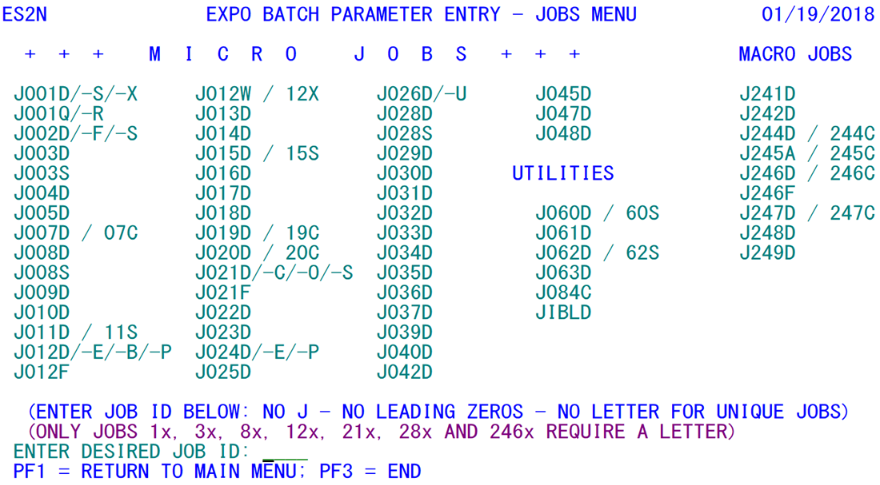
This program enables the QCEW analyst to set all pertinent batch job parameters from on-line entries. The primary menu (shown above) lists all of the batch job names that require program parameter specifications. Most of these receive parameter changes from supplemental screens controlled by this program. Four jobs, however, require separate programs to process their more complex parameter settings. These are Job 020D (micro selection report parameters, handled by the ES2NP03 program), Job 040D (micro super-selection parameters, controlled by the ES2NP04 program), Job 246D (macro summary report parameters, specified through the ES2NP02 program), and Job 247D (ALMIS extracts of macro data using the ES2NP05 program). The NP02, NP03, NP04 and NP05 programs update records on the Rollup Parameters File (ES2RUP), rather than on the Lookup File where the other job parameters are stored. In addition, Job 244D parameters identify which publication report to produce, but the details of how these publications are set up appear in the Publications Data File, maintained by the ES2U transaction, described later.
To select a job for parameter entry, type in the job ID in the bottom field, preceded by the prompt- “ENTER DESIRED JOB ID:”. The job ID can be abbreviated to the point that it is unique. For instance, the ES2J012F job would only need to be entered as “12F” (or ‘012F’) since there is also a ‘12D’ job on the list. Some jobs entries can be remarkably brief, such as Job ES2J009D, which can be entered as “9”.
Several jobs have no parameters to enter at all. These include Jobs 035S (IGT/Micro PLA comparison), 038D (MWR-Web historical file build), 043D (IMAT batch update processing), 044D (Large Imputation Spreadsheets), 049D (Update 2017 Split NAICS (obsolete)), 050D (alpha locator rebuild), and 051D (Crosswalk Files rebuild). Therefore, they are absent from the list. In addition, Jobs 001S, 001X, 001R, 002F, 002S, 007C, 011S, 012E, 012B, 012P, 012X, 015S, 019C, 020C, 021C, 021O, 021S, 024E , 024P, 026U, 060S, 062S, 244C, 245C, 246C, and 247C are listed only in conjunction with other jobs, as they share the parameters used by the primary job. For additional information about batch jobs, reference the Batch Job Processing documentation.
Other methods of program parameter entry, such as SYSIN JCL entries and ‘PARM=’ specifications for BLS-developed programs, are not used in EXPO. This places both control over, and responsibility for, parameter precision in the hands of the QCEW unit. Only a few JCL modifications are needed under this system, such as file name changes to specify the year and quarter of the EQUI Deliverable’s Data Set Name (DSN). For the Service Center States, even these adjustments are handled systematically through the use of CLIST panels and JCL organization.
A two-step process is required to update the parameters of any job: following the selection of the job from the menu screen, type in any alterations to the existing parameters, then press the Enter key. This loads the changes into the Lookup File’s job parameter record. Then, press the F1 key to return to the batch jobs menu. Do not attempt to use the F1 key after typing in the new parameters before first pressing the Enter key; otherwise, all of the parameter changes will be lost. It is also required that the F1 key be pressed after the updates are done, as the program will just “sit there” in the detail screen until you give it the Menu-exit command. This is another built-in safeguard, allowing you to review your entered parameters before leaving the detail screen.
A separate job parameters entry screen is provided for each of the jobs listed on the menu screen. These screens are not shown here, except for the specialized parameter entry of Jobs 020D, 040D, 246D and 247D. To get a complete list of all of the job parameter screen formats, along with how to set each parameter, please refer to Appendix H (Parameter Descriptions). Appendix H provides full details on batch job parameters, listing all possible options and their effects on processing.
Job-based parameter records are stored in the Job Parameters File, which is an alias of the Lookup File. Each of the covered batch jobs uses the ES2UT19 program to read the job’s parameters and separate them out into individual program parameter records, which are then read by each parameter-driven program. These parameters also include the job ID, which is added to report page header data. Each individual program will search the Program Parameters File that was produced by ES2UT19 program. When it finds its own program ID (found in positions 5 through 8 of the record, e.g., ‘MI01’ for ES2MI01), the program will retrieve those parameters for itself and load them into its working-storage parameters record. The program then proceeds with the interpretation of the parameters, utilizing them to complete its designated purpose.
Although Jobs 020D, 040D, 246D and 247D also utilize their own program parameter selection screen, each of these screens acts as a sub-menu leading to detailed parameter entry and update processes. They will be shown later (though 247D is omitted since it is virtually identical to the 246D layout).
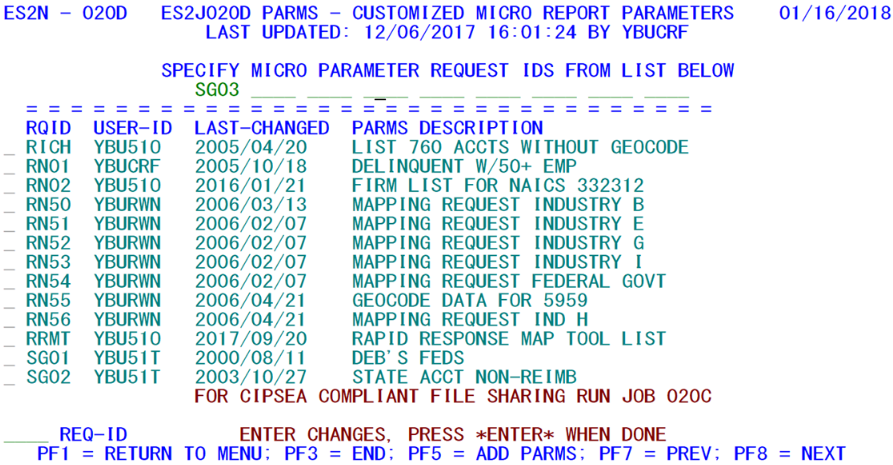
The sample screen shown below, is drawn from the parameters menu list used for micro selection in Job 020D. Since the parameter-ID menu screens of the 040D, 246D and 247D jobs are essentially identical to job 020D’s, they are not listed. The screen is split into the top and bottom portion by a row of equal signs (“=”). Above the separator is a row of selection fields in which the QCEW analyst may place up to nine of the parameter ID’s from the list below. In this case, only a single parameter set has been chosen (SG03). The lower portion of the screen lists the parameters available for selection, along with the last person to update them, the date of last update, and a brief description of the focus or intent of the selection parameters. These fields are all taken from the Roll-up Parameters File. When more parameter sets are available than can be displayed on a single screen, the F7 and F8 keys can be used to page through the entries to obtain the desired selection data.
If you need to inspect the specifics of a particular parameter set’s selection option, tab down to the underscore character preceding the selection parameters in question (the RQID field) and press the Enter key. This will transfer to the 020D, 040D, 246D or 247D detailed parameter update screens, which are shown on the pages that follow. Everything from NAICS codes to ZIP codes can be used as selection parameters and laid out on a fairly “busy” screen. After you have applied any needed adjustments to the parameters, press the Enter key to lock in your changes. Pressing F1 afterward will return you to the selections menu, where the new parameter set can be copied by its 4-character ID into one of fields along the top-line list.
New parameters can be established by pressing the F5 key; this can be used either from the parameter menu screen for that job, or while displaying the detailed parameters of an existing parameter set (however, any changes made to another detail screen without pressing the Enter key prior to the F5 key will be lost). This will bring up the 020D, 040D, 246D or 247D parameters screen, but with all fields shown as underscores. It is most important during the parameter addition to specify the 4-character request ID code, since this is the key for the record. Though parameters may be changed at will, the record key cannot be changed; therefore it is essential to establish the ID code at once.
A parallel process to the 020D/040D/246D/247D processes described below is the Refiling Report selection process of Job 107D. The screen processing for this will be described in the EARS portion of this CICS document, as part of the EARN transaction.
Even though up to nine parameter sets may be selected for any single job run, there may be hundreds of parameter sets stored and called upon whenever they are needed. If one of the parameter sets becomes obsolete, it can be discarded. To do this, select the parameters from the job’s menu screen (so the detailed parameters are displayed). This selection helps you to ensure that you’ve selected the correct parameters – the ones that are to be removed. While the parameters are displayed, press the F4 key. This method of parameter deletion differs from the rest of the EXPO/EARS system (which uses a “*D” notation to signal a deletion). The use of the F4 key is a throw-back to the early days of the system when it was necessary to remove all parameter sets before creating new ones. Parameter deletion is no longer required, however, so is not often performed any more (as can be seen by the parameters that are nearly 18 years old in the menu).
Anywhere from one to nine sets of parameters are requested in a single run of Job 020D (or any of the other multi-parameter selection jobs). If only a single parameter set is needed for the next go-round, however, all other request ID’s listed on that top line should be removed, either by spacing through the fields or by pressing the Erase-to-end-Of-Field (EOF) key (which is represented on PC keyboards as the End key). This does not delete any of the parameter sets themselves, but simply ensures that the same report will not be generated again when it is no longer needed.
Related Links

