05 es2c micro file inquiry maintenance
ES2C - Micro File Inquiry / Maintenance
| Program ID: | ES2CP01, ES2CP02, ES2CP03, ES2CP04 |
|---|---|
| Mapset: | ES2CMS1, ES2CMS2, ES2CMS3, ES2CMS4 |
| Input Files: | Internal Security File (ES2SECR), Micro Edit Cross-Reference File (ES2MEXR), Wage Summary File (ES2WAGE) |
| I/O Files: | Lookup File (ES2LKUP), Micro File (ES2MIC), Micro Omni (or Omnifarious) Auxiliary File (ES2MOA), Narrative Comment File (ES2NARC), Predecessor / Successor Actual File (ES2PSA), Refiling Master File (EARREF) |
| Output Files: | Administrative Transaction File (ES2ATRN), Account Groups File (ES2GRP), Micro-Omni-Aux Transaction File (ES2MTRN), Quarterly Transaction File (ES2QTRN), Refiling Transactions File (EARRTRN) |
Note: The file ID’s (e.g., “ES2LKUP”) shown above use the non-Service Center naming convention. Service Center States have a format of “EssLKUP”, where the “ss” characters are the State postal abbreviation. The one exception is the Security File, which maintains the original naming convention, since there is only one Security File for each Service Center CICS region (EXPOPROD and EXPOBETA).
This screen is the most complete source of on-line inquiry/update for the Micro File, as well as the Micro Omni Auxiliary File (sometimes referred to as the MOA File or just the Micro Auxiliary File). This CICS transaction provides the means of manually updating micro-level data. It uses the Lookup File to validate NAICS, county, and sub-county zones, or New England township codes. It creates transaction records on all four Transaction Files for the EXPO and EARS Audit Trail Reports (produced in Jobs ES2J016D and EARJ116D), and for on-line review with the ES2P and EARP screens. The transaction records may also be used to update the State-specific source file(s).
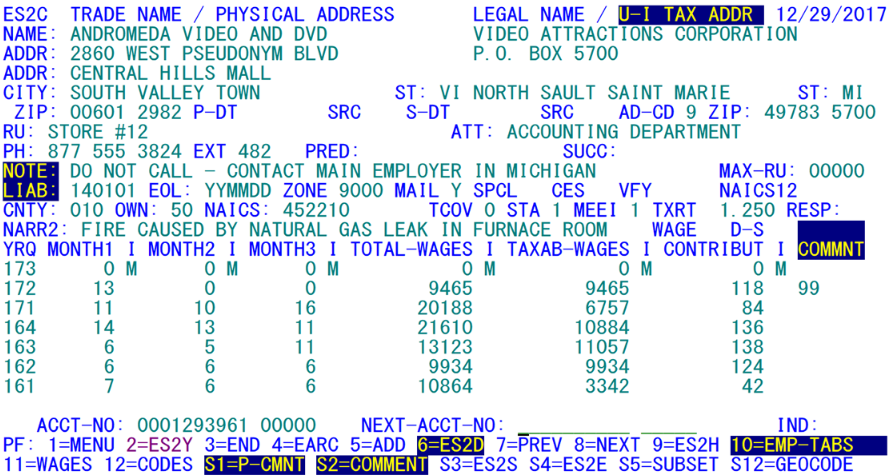
The Front (or Primary) Screen (displayed below), contains most of the micro administrative data elements as well as employment and wage data for seven quarters. Values for county, ownership, NAICS, MEEI, and status code are also displayed. These represent current quarter values (those found in the second occurrence of the Micro File quarters table). Reverse video is used to denote yellow-colored fields (to indicate prompts with variable text messages).
The other three ES2C screens are referenced by their primary function.
- The “second” screen is called the “Codes Screen”, since it contains quarterly code values, such as county, NAICS, type-of-coverage, etc., throughout the Micro File quarters.
- The “third” screen is referred to as the “Geocoding Screen”, as it is fully stocked with all of the fields associated with the geocoding project from BLS.
- The “fourth” screen is identified as the “Wage Summary Screen”, since it includes optional Wage Summary File information, in addition to various other supplemental data fields and refiling-related data.
Each of these other screens will be described in turn later on. Function keys have been assigned to toggle to and from each of the other ES2C screens from this front screen.
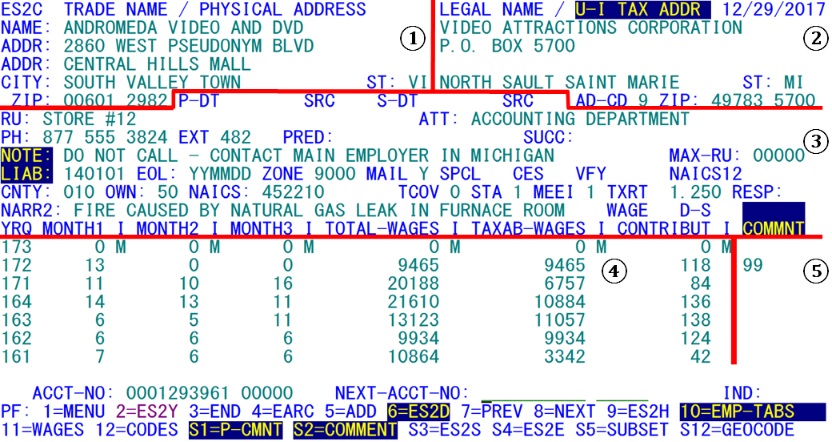
Updates on the Front Screen can be partitioned in six ways, as shown in the example of the screen below. Five areas of the screen are identified. When switching from inquiry to change mode, by pressing the F10 key for tab settings changes, the first partitioning option is the Employment/Wage Tabs setting, which allows changes to Sections ④ and ⑤, but leaves the other areas of the screen closed to update. The second tab setting, called “All Tabs”, is set by retyping the F10 key. Successive pressing of the F10 key rotates through the other display modes, as shown in the table that appears on the next page. The description for the F10 key will change every time it is pressed, to describe the next set of tab settings in the rotation. If the F10 key is pressed once more than had been intended, use the Shift-F10 key combination (PF22) to retrieve the previous setting. The Shift-F10 pair reverses the direction of the screen area highlighting sequence.
| Tab Setting Description | Active Areas | Inactive Areas |
|---|---|---|
| 1. Employment and Wage Tabs (Code E) | ④⑤ | ①②③ |
| 2. All Tabs (Code F) | ①②③④⑤ | (None) |
| 3. Trade Name, Physical Address Tabs (Code G) | ① | ②③④⑤ |
| 4. Legal Name, Mailing Address Tabs (Code A) | ② | ①③④⑤ |
| 5. Dates, Notes, Codes (Mid-Screen) (Code B) | ③ | ①②④⑤ |
| 6. Comments / State Usage Tabs (Code C) | ⑤ | ①②③④ |
Note that there is no update code “D” listed on the previous chart. That is because “D” is the tab setting used for inquiry-only processing. You can switch into and out of inquiry mode by pressing the F10 key to cycle back through the various updating modes back to the inquiry-only setting. Anyone who has inquiry-only access, however, will always remain in “D” code perpetually, and pressing the F10 key will have no effect.
Most of the information displayed on this screen comes directly from the Micro record. Screen Area ① (displayed below) contains the Trade Name (sometimes referred to as the Doing-Business-As or DBA Name), and physical location address (PLA) block, and the Reporting Unit (“RU:”) description (a special identifier or description by which the employer can recognize a worksite location); all of these data items are drawn from the administrative area of the record.
Screen Area ② (displayed below) includes the Legal/Corporate name along with either the U-I address (UIA) block or the Mailing/Other address (MOA) block and the attention (or “contact”) name. The U-I address appears after the physical address in the Micro File record, while the “MOA” originates in the Micro Omni Auxiliary File, as does the attention/contact name. When both addresses exist, the MOA is displayed here, while the U-I address will always be displayed on the Codes ES2C screen (to be described later).
Note: Even though the update codes allow entry only to certain sections of the screen, the global lock switches (found in the ES2I screen, and displayed in the lower, right-hand portion of the screen) will block access to some of the quarters and/or administrative data. System administrators (with an access level of “A”) will see all fields of the affected region in green (updateable) when they enter the ES2C transaction (the lock switches will also vanish). The normal protection of fields is overridden for system administrators.
Area ③ (shown below) is a composite of data from several sources. These sources include: Micro File administrative and current quarter fields; both the perennial narrative note and the current-quarter narrative comment, both of which are stored in the Narrative Comments File; and the most recent predecessor and successor information (SESA ID, transfer date, and source code) – these are drawn from the Predecessor/Successor Actual (PSA) File. If, for example, a predecessor has been identified, with a transfer of ownership occurring on January 1st, 2015 (shown in “yymmdd” format as “150101”); the “WR” source means that the predecessor association was found by examining Wage Record data. Since the PSA File can have multiple predecessors and/or successors for any given establishment, only the most recent predecessor or successor is displayed on the screen. If there are more relationships present for this employer, the predecessor/successor SESA ID will be displayed in reverse video, with the background in turquoise or green (depending on whether the field is updateable), and the characters in black (or whatever has been defined as the standard background color for the screen).
Some of the micro administrative data in Area ③ include the phone number (broken into area, exchange, suffix and an optional 5-digit extension), initial liability date and end-of-liability date (if a reactivation (or reopening) date exists, it is used in place of the initial liability date, and alters the label from “LIAB” to “REAC”), mailing indicator, the CES indicator, the most recent EARS successful refiling year (known as the Verify year), and the current (or most recent) refiling response code. Current quarter elements are the zone/township, county, ownership, NAICS, special account code (shown as “SPCL:”), type of coverage, status, MEEI, and tax rate.
Screen Area ④ contains the quarterly employment and wage fields, taken directly from the quarterly data portion of the Micro record.
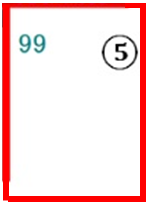
Area ⑤ (shown below) represents either quarterly comment codes (up to three 2-digit codes) or the quarterly State Usage field. If you type a “C” as an entry to the Next SESA ID prompt, it will toggle between the comment and state usage display modes. This also alters the description of the PF14 (Shift-F2) prompt at the bottom of the screen.
The lock codes form an informational field in the lower-right-hand portion of the screen. With the label of “FILE LOCKS:”, it lists codes for which areas of the data are non-updateable. If everything is locked, the display shows “A1234567P”. The “A” at the beginning means that most administrative data cannot be changed. The numeric values “1” through “7” refer to the seven quarters of employment and wage data shown in the lower half of the screen, with “1” showing the future quarter and “7” representing the oldest displayed quarter (second prior quarter from the previous year; the eighth micro quarter is never displayed on the ES2C screen). The “P” at the end of the list can lock the physical location address and geocoding information separately from all other administrative and quarterly data fields. When the “A” appears, but the “P” does not, it signals that the physical address can still be modified (to assist in the geocoding of establishments) even though all other administrative data (names, addresses, phone numbers, dates, etc.), cannot be altered.
As noted previously, the “File Locks” area will be removed from the screen when the person using the screen has administrator (“A”) level security access, as is the case in the sample screen. Special access has been granted to persons with administrator-level access to the EXPO and EARS systems. These are the individuals who have an “A” in the access-level field of the ES2M screen. For administrators, the locks listed in the “FILE LOCKS:” section have no effect. In update mode (with the F10 key pressed), any fields that are included in the updating zone are in green, even if that section is locked to other persons. The reason for this feature is to help in resolving last-minute data entry errors just before submission of the EQUI deliverable. The entire file can remain locked while the administrator makes the final clean-up changes to micro data.
Some administrators prefer not to keep the file unlocked to them, except under rare circumstances. This helps to avoid accidental changes while perusing micro data during the normal course of the day. To remove the administrator overrides, the administrator needs to switch to the ES2M transaction (described later), and change his/her own security access level from “A” to “M” (for “Manager” level). This setting is equivalent to an “A”, but keeps the data locks in place while in ES2C or any other updating screen. Be sure not to alter the security level code to a “U” (standard “Update” authorization) or an “I” (Inquiry-only access), as these settings will make it impossible to get back into the ES2M screen to make further changes. Manager-level persons are able to promote themselves to Administrator level whenever the need arises.
Related Links


